
Tired of cluttered spaces and overflowing closets? DIY storage solutions offer a fantastic alternative to expensive, pre-made options. By crafting custom storage, you gain control over design, materials, and cost, transforming unused areas into functional and aesthetically pleasing spaces. Whether you’re tackling a cramped apartment, a disorganized garage, or a messy bedroom, the possibilities are as limitless as your creativity.
This guide explores the entire process, from initial planning and design to construction, material selection, and finishing touches. We’ll cover various techniques, provide step-by-step instructions for building simple yet effective storage solutions, and offer creative ideas to maximize your space and personalize your storage to match your individual style and needs. We’ll also address safety concerns and offer environmentally conscious alternatives.
Material Selection and Sourcing
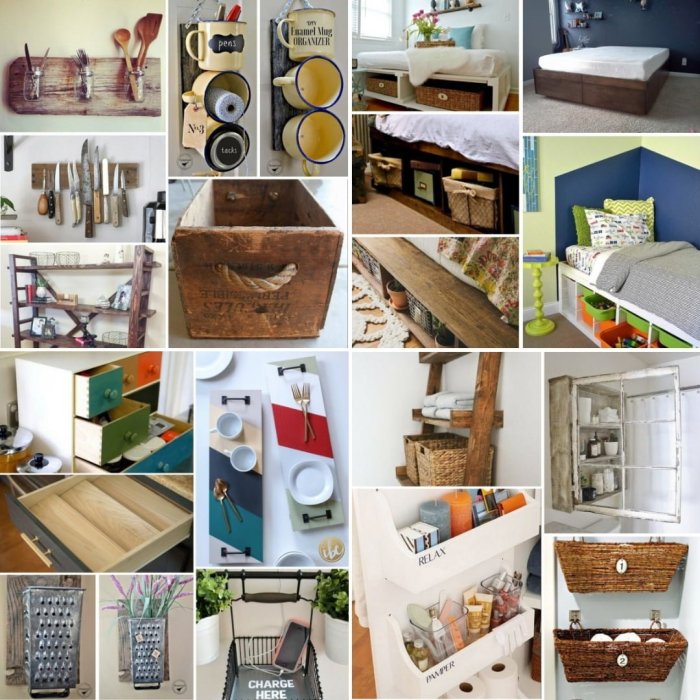
Choosing the right materials is crucial for successful DIY storage solutions. The ideal material will depend on your budget, the intended use of the storage, and your aesthetic preferences. Factors like durability, ease of construction, and maintenance should also be carefully considered. Let’s explore some popular options and their characteristics.
Material Options for DIY Storage
Several materials are readily available and well-suited for DIY storage projects. Wood offers a classic, versatile, and often aesthetically pleasing option. Plastic provides a lightweight, waterproof, and often inexpensive alternative. Repurposed and upcycled materials offer a sustainable and budget-friendly choice, adding a unique character to your storage solutions.
Wood: Pros, Cons, and Sourcing
Wood is a popular choice for DIY storage due to its strength, durability, and aesthetic appeal. It can be stained, painted, or left natural to match any décor. However, wood can be more expensive than other materials and requires more skill to work with. Sourcing wood can be done through lumber yards, salvage yards, or even by reclaiming wood from demolition projects.
Reclaimed wood, for example, offers a unique character and sustainability benefit. Consider the type of wood; hardwoods like oak are more durable but more costly than softwoods like pine.
Plastic: Pros, Cons, and Sourcing
Plastic offers several advantages, including its low cost, lightweight nature, and water resistance. It’s easy to work with and requires minimal tools. However, plastic may not be as aesthetically pleasing as wood and can be less durable, potentially cracking or breaking under stress. Sourcing plastic can be achieved through retailers selling storage containers, or by repurposing existing plastic containers (e.g., tubs, crates).
Remember to check the type of plastic; some are more recyclable and durable than others.
Repurposed and Upcycled Materials: Pros, Cons, and Sourcing
Repurposing and upcycling existing materials offer a sustainable and budget-friendly approach. Old crates, pallets, jars, and even discarded furniture can be transformed into unique storage solutions. This method minimizes waste and adds a unique, often rustic, charm. The main drawbacks include the need for creativity and adaptability, as well as potential limitations in terms of size and functionality.
Sourcing materials involves searching your home, attending garage sales, or checking online marketplaces for discarded items. For example, old ladders can be transformed into shelving units, and repurposed drawers can create a stylish bedside table.
Construction Techniques and Methods
Creating effective DIY storage solutions hinges on understanding and employing appropriate construction techniques. The choice of method depends largely on the type of storage unit you’re building, the materials you’ve selected, and your own skill level. This section will explore common techniques for building shelves, drawers, and modular units, providing a step-by-step guide for a simple bookshelf project.
Common DIY storage construction techniques involve a range of joinery methods, fastening techniques, and material handling processes. Understanding these techniques ensures the stability and longevity of your storage solutions. From simple butt joints to more complex dovetail joints, the choice depends on the desired strength and aesthetic appeal. Similarly, appropriate fasteners, such as screws, nails, or adhesives, are crucial for secure assembly.
Careful material handling, including accurate measuring and cutting, is essential for a professional finish.
Building a Simple Bookshelf
This section details the construction of a basic bookshelf using readily available materials like lumber and shelf brackets. This project is ideal for beginners and demonstrates fundamental carpentry skills.
Before starting, gather your materials: lumber (pine or similar), shelf brackets (metal or wooden), screws, a drill, a level, a measuring tape, and a saw. Ensure your lumber is appropriately treated for indoor use and is free from significant knots or imperfections.
- Cut the lumber: Cut the lumber to the desired lengths for the shelf supports (vertical pieces) and the shelves (horizontal pieces). Accurate measurements are crucial for a stable structure. Use a saw appropriate for the type of lumber you’ve chosen.
- Attach the shelf brackets: Securely attach the shelf brackets to the shelf supports using screws. Ensure the brackets are evenly spaced and level. Pre-drilling pilot holes will prevent the wood from splitting.
- Position the shelves: Carefully place the shelves onto the brackets, ensuring they are level and flush against the supports. The weight of the books will add stability to the structure, but accurate positioning from the start is essential.
- Attach the bookshelf to the wall (optional): For added stability, especially for taller bookshelves, attach the bookshelf to the wall using appropriate wall anchors. The method will depend on your wall type (see below).
Methods for Attaching Shelves to Walls
Securely attaching shelves to walls is critical for safety and stability. The appropriate method depends on the wall type.
Different wall types require different approaches to ensure secure attachment. Drywall, plaster, and brick walls all have varying strengths and require different fasteners. Using the incorrect fasteners can lead to the shelves becoming unstable or falling, potentially causing damage or injury.
- Drywall: Use drywall anchors designed for the weight of the shelves. These anchors expand behind the drywall, providing a secure hold. Always pre-drill pilot holes to prevent cracking the drywall.
- Plaster walls: Plaster walls can be more challenging. Use specialized plasterboard screws or wall plugs designed for plaster. These plugs create a secure grip within the plaster, preventing the screws from pulling out.
- Brick walls: Brick walls are typically strong and can support heavier shelves. Use masonry screws and drill directly into the brick. Use a masonry drill bit appropriate for the type of brick.
Finishing Touches and Customization
Transforming your DIY storage solution from functional to fabulous involves thoughtful finishing touches and personalized customization. The final steps are crucial in ensuring your project not only meets its practical needs but also seamlessly integrates with your existing décor and reflects your personal style. A little extra effort in this stage can elevate a simple storage unit into a beautiful and functional asset for your home.
Careful consideration of paint, decorative elements, and protective measures will ensure your creation stands the test of time and enhances your living space. The following sections detail practical strategies to achieve a polished and customized finish.
Painting and Decorating Techniques
Choosing the right paint and applying it correctly is key to a professional-looking finish. Consider the material of your storage solution; for example, wood requires a primer before painting to ensure better adhesion and prevent the wood grain from showing through. A high-quality paint, such as a semi-gloss or satin finish, is recommended for durability and easy cleaning.
Color selection should complement your existing décor. Neutral colors, like whites, grays, or beiges, offer versatility, while bolder colors can add a pop of personality. Consider using painter’s tape for clean lines if you plan on creating a multi-colored or patterned design. For a more textured look, consider using techniques like sponging or dry brushing.
Labeling and Organization Strategies
Clear and concise labeling is crucial for maximizing the functionality of your DIY storage solutions. Pre-printed labels are readily available in various sizes and styles, but you can also create custom labels using a computer and label maker for a more personalized touch. Consider using different colors or fonts to categorize items. For example, you might use blue for books, green for gardening supplies, and red for tools.
In addition to labels, consider incorporating internal organizers such as drawers, dividers, or shelves to further compartmentalize items and prevent clutter. For example, a spice rack within a kitchen cabinet can keep spices organized and easily accessible.
Protecting DIY Storage Solutions from Damage
Protecting your investment requires careful consideration of potential damage sources. For wooden storage solutions, consider applying a sealant or varnish after painting to protect against moisture and scratches. For metal storage solutions, a clear coat of sealant can prevent rust and corrosion. Regular dusting and cleaning will also help maintain the appearance and prolong the life of your storage solutions.
Avoid placing heavy items on shelves that may not be able to support their weight, and be mindful of sharp objects that could scratch the surface. Using protective feet or pads on the bottom of the storage unit can prevent scratches on the floor and ensure stability.
Safety Considerations
Building your own storage solutions can be a rewarding experience, but safety should always be the top priority. Ignoring safety precautions can lead to injuries, damage to your project, or even property damage. This section details potential hazards and Artikels essential safety measures to ensure a safe and successful project.Proper safety measures are crucial throughout the entire DIY storage project lifecycle, from initial planning to the final finishing touches.
Failing to prioritize safety can result in avoidable accidents and injuries.
Tool Safety
Safe tool usage is paramount. Always ensure tools are in good working order, with sharp blades and properly tightened components. Before using any power tool, read the manufacturer’s instructions carefully and wear appropriate personal protective equipment (PPE). This includes safety glasses to protect your eyes from flying debris, hearing protection to mitigate noise-induced hearing loss, and work gloves to prevent cuts and abrasions.
For example, when using a circular saw, always use a push stick to keep your hands a safe distance from the blade. When using a drill, always secure the workpiece to prevent it from spinning unexpectedly. Regularly inspect your tools for damage and replace or repair them as needed.
Structural Stability
Ensuring the stability of your storage solution is critical to prevent collapse and potential injury. Use appropriate materials and construction techniques for the intended load. For example, using particleboard for heavy items might lead to sagging or failure. Properly secure all joints and connections using appropriate fasteners and adhesives. Consider the weight capacity of the storage unit and avoid overloading it.
For shelves, consider adding supports or bracing to increase their load-bearing capacity, especially for longer spans. A well-designed and constructed unit should be able to withstand the intended weight without showing signs of stress or instability.
Material Handling
Lifting and moving heavy materials can pose a significant risk of back injury. Always lift with your legs, keeping your back straight, and avoid twisting. Use a hand truck or other lifting aids when handling heavy or bulky items. When cutting materials like wood or metal, always use appropriate supports to prevent them from falling or shifting.
For example, when cutting a large sheet of plywood, secure it firmly to a workbench to prevent it from moving unexpectedly. Working with others can significantly aid in safely handling heavy materials, allowing for teamwork and reducing the strain on any single individual.
Environmental Hazards
Dust from sawing and sanding can be a respiratory irritant. Always wear a dust mask, especially when working with materials like wood or drywall. Proper ventilation is also essential to reduce dust accumulation and improve air quality. Work in a well-ventilated area, or use a dust collection system attached to power tools. Dispose of waste materials properly, according to local regulations, to avoid environmental contamination.
For example, certain paints and solvents require special disposal methods. Always follow the manufacturer’s instructions and consult your local waste management authority for proper disposal procedures.
Storage Solutions
Creating effective storage is crucial for a functional and aesthetically pleasing home. This section delves into a broader perspective on storage solutions, comparing DIY approaches with commercially available options, considering their environmental impact, and exploring various organization methodologies.
Comparison of Commercial and DIY Storage Solutions
Commercially available storage solutions offer convenience and often come with warranties. They range from pre-assembled shelving units readily available at big-box stores to custom-designed closets from specialized companies. These options often utilize standardized materials and manufacturing processes, leading to consistent quality and ease of assembly (or installation). Conversely, DIY storage solutions offer greater customization and can be tailored to specific spaces and needs.
However, they require more time, effort, and often specific skills. The initial cost might appear lower for DIY projects, but unexpected expenses related to materials or tools can quickly negate this advantage. Ultimately, the best choice depends on individual skills, available time, budget, and the complexity of the storage needs. For example, a simple shelving unit might be easily and cost-effectively constructed DIY, while a complex, built-in wardrobe system would likely be more efficiently sourced commercially.
Environmental Impact of DIY vs. Commercial Storage
The environmental impact of DIY versus commercially produced storage is multifaceted. DIY projects can reduce transportation emissions associated with shipping pre-made units. Using reclaimed or recycled materials in DIY projects further minimizes the environmental footprint. However, DIY projects might generate more waste during construction, especially if precision cutting or construction is involved. Commercially produced units often adhere to standardized manufacturing processes, potentially leading to more efficient resource utilization and reduced waste.
The environmental impact also depends on the materials used; sustainably sourced wood in a DIY project is environmentally preferable to a mass-produced plastic shelving unit. A life-cycle assessment, considering material sourcing, manufacturing, transportation, use, and disposal, would be necessary for a comprehensive comparison.
Storage Organization Methods
Effective storage goes beyond simply having enough space; organization is key. Several established methods can significantly improve storage efficiency and ease of access. The KonMari Method, developed by Marie Kondo, emphasizes keeping only items that “spark joy” and organizing by category (clothing, books, papers, etc.), then by vertical stacking. This method prioritizes minimizing clutter and creating a sense of calm.
Minimalism, on the other hand, focuses on owning only essential items, reducing possessions to improve space and reduce stress. Both methods, while distinct, share a common goal of decluttering and maximizing the functionality of available space. Other methods, such as the “one-in, one-out” rule (for every new item acquired, an old one is removed) or the use of clear storage containers to visually organize items, can also contribute to efficient and aesthetically pleasing storage.
Ultimately, embracing DIY storage solutions empowers you to conquer clutter and create a more organized and functional living environment. By carefully planning, selecting appropriate materials, and employing safe construction techniques, you can transform your home with custom storage that reflects your personal style and budget. The satisfaction of creating something practical and beautiful with your own hands is a rewarding experience that extends beyond mere organization.
FAQ Insights
What tools are essential for most DIY storage projects?
Basic tools like a measuring tape, level, drill, screwdriver, saw (depending on materials), and safety glasses are usually sufficient. More specialized tools might be needed depending on the project.
How do I determine the right size for my DIY storage solution?
Accurate measurements of the space are crucial. Consider the items you’ll be storing and allow for comfortable access and retrieval. Sketching the space and your planned storage can help visualize the final result.
Can I use reclaimed wood for my DIY storage project?
Yes, reclaimed wood is a sustainable and often cost-effective option. However, ensure it’s properly treated and free from pests or rot before use.
How can I ensure my DIY shelves are securely attached to the wall?
Use appropriate wall anchors based on your wall type (drywall, brick, etc.). Always follow the manufacturer’s instructions for the anchors and ensure the shelves are properly supported.


